1. Enable Gzip.
2. Enable caching for static contents.
Enable Gzip
As I am a Joomla fan, first I would like to describe how to enable Gzip in Joomla. Before doing this make sure that you have already installed "mod_gzip" extension in apache.
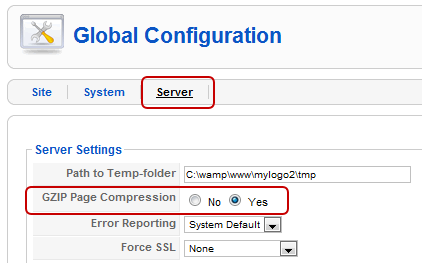
- Login to your Joomla administration section and go to the ''Global Configurations".

- In Global Configurations, click on "server" and change "Gzip page compression" to Yes.
And now lets see how to enable Gzip compression using .htaccess. Please make sure that your hosting provider has enabled "mod_gzip" module or if you have your own server, check whether you have already installed and enabled this module for apache.
If everything ok, just put the below code in your .htaccess file.
If you don't have a .htaccess file, create one and upload it to your web root.mod_gzip_on Yes mod_gzip_dechunk Yes mod_gzip_item_include file \.(html?|txt|css|js|php|pl)$ mod_gzip_item_include handler ^cgi-script$ mod_gzip_item_include mime ^text/.* mod_gzip_item_include mime ^application/x-javascript.* mod_gzip_item_exclude mime ^image/.* mod_gzip_item_exclude rspheader ^Content-Encoding:.*gzip.*
Enable caching for static contents
Now lets see how to enable caching for static contents. How this caching really helps you to make your website faster?
When a visitor visits first time, your page will send several HTTP requests to download all the contents. By setting expire headers in the .htaccess you can make some of those static files (images, js, css) cachable and this will reduce HTTP requests in subsequent page views. In other words your site will be loaded in subsequent visits.
To set the expires headers add these lines to your .htaccess file
More information about this can be found at http://httpd.apache.org/docs/2.0/mod/mod_expires.html
Finally lets see how to enable caching in the Joomla administration section. As before go to the "Global Configuration" and this time click on "system" tab.


Now lets see how to enable caching for static contents. How this caching really helps you to make your website faster?
When a visitor visits first time, your page will send several HTTP requests to download all the contents. By setting expire headers in the .htaccess you can make some of those static files (images, js, css) cachable and this will reduce HTTP requests in subsequent page views. In other words your site will be loaded in subsequent visits.
To set the expires headers add these lines to your .htaccess file
  ExpiresActive On
  ExpiresDefault "access plus 1 seconds"
  ExpiresByType text/html "access plus 1 weeks"
  ExpiresByType image/gif "access plus 3 weeks"
  ExpiresByType image/jpeg "access plus 3 weeks"
  ExpiresByType image/png "access plus 3 weeks"
  ExpiresByType text/css "access plus 3 weeks"
  ExpiresByType text/javascript "access plus 2 weeks"
  ExpiresByType application/x-javascript "access plus 2 weeks"
More information about this can be found at http://httpd.apache.org/docs/2.0/mod/mod_expires.html
Finally lets see how to enable caching in the Joomla administration section. As before go to the "Global Configuration" and this time click on "system" tab.
Then find the "Cache Settings" and change the Cache to Yes as below.